6 Awesome Android Apps Not Available on Google Play Store

6 Awesome Android Apps Not Available on Google Play Store

09:42 0
At the recently held annual Google I/O conference, Sundar Pichai announced that out of every 10 phones shipped worldwide, 8 were running on Android. What’s more, there are more than 1 billion active users on the Google Play Store. Surprisingly though, not all great apps that you can run on your Android device are available directly on the Play Store itself. There are some that are available elsewhere and Google will not publish these due to their nature or non-compliance of certain Google policies.
Bloomua / Shutterstock.com
To make matters simpler, we’ve divided the article in 2 separate sections. The first for non-rooted phones and the second for rooted devices.
To Root or Not to Root? We explore the pros and cons of rooting and talk about whether it’s right for you. Do check it out.

Unrooted Devices

1. Popcorn Time

Love watching TV Shows & Movies? Well, who doesn’t. Popcorn Time lets you do just that with the convenience of a simple yet elegant app. Once installed, it gives you easy access to the most popular Movies and TV shows by a simple swipe from the right. There is also a third category for Anime as well, if you’re into those.
Popcorn Time_Main Screen Popcorn Time_Sidebar Menu
There’s a built-in VPN option for those who want to use the app securely. There are plenty of options to customize the look and feel of the app, from the color and size of the font, to the total number of connections and maximum download speed. The whole service runs on torrents, so ensure you have good bandwidth while choosing which movie to stream. Get Popcorn Time here.
Note: Needless to say, the movies you watch using the above app may or may not be legal. At Guiding Tech we neither condemn nor condone piracy. So do check the laws of your land before you decide to use any torrent-based app, including the one we mention above.

2. MiXplorer

A free non ad-supported file browser with great functionality built right into it – that’s the easiest way to describe MiXplorer. The app looks like it’s running Material Design, but is compatible with Android devices running OS v2.0+ (if they’re still around).
MiXplorer_Menu MiXplorer_Settings
Not only does it have a theme engine to customize the looks of the app, but it also has cloud integration with more than a dozen services. Although you may require root access to enjoy some of the more advanced features of this app, even so, this is a great app, well worth exploring. Get MiXplorer here.

3. QuickLyric

Ever wanted an app that gives you the lyrics of all the songs in your library? Well, this is the perfect app for you, and even though there are some alternatives available on the Play Store, they don’t all scan your music library and download the lyrics for offline use.
Quick Lyric_Main Quick Lyric_Download
It also appears that the devs of this app have tried their best to stick to Material Design, although it’s not a uniform experience throughout. But who’s complaining for an app that’s free and works like a charm every time. Get QuickLyric here.

Rooted Devices

1. Adaway

Ads by Google
Tired of all the ads that keep popping up in those ad-supported apps? Well, there is an easy fix to this problem. Simply install Adaway! Naturally, Google has never been fond of such apps and you will never find these in the Play Store. But how hard is sideloading an Android app anyway? Once installed, it simply checks for updated files and merges them with the current list.
AdAway Splash Screen Adaway Main Window
Once installed, there’s nothing else that needs to be done. The app does all the hard work automagically, while you can enjoy all your (ad-supported) apps without interruptions and annoying pop-ups.
Helpful Note: If you wish to know how to make your Android phone completely ad-free, then refer to our article.

2. Market Helper

Want to install those tablet-only apps on your smartphone? Or vice-versa? Well, Market Helper is just the app that you’re looking for. Once you install the app, just go about selecting what device you want emulated, even if you wish to select a different carrier. Once selected, hitActivate, and voila! You’ve got a notice that your device is registered as the one you wanted.
Market Help_Setup Market Help_Confrimation
Not all carriers in countries with an asterisk are supported, but hey – something is better than nothing, right?! Also, if you feel that your phone has been transforming a bit too much and you can’t even recognize it anymore, all you have to do is a simple reboot. It goes back to whatever it was before it started shape-shifting. Err, you know what I mean!

3. Lucky Patcher

Want to remove ads? Check. Want to modify permissions given to apps? Check. Want to bypass premium license verification and still do more? Check, check, and check! This is the ultimate all-in-one amazing app that you’ve been waiting for.
Lucky Patcher_Menu Lucky Patcher_Options
Lucky Patcher also gives you unlimited access to reading apps like NYT and The Wall Street Journal, but since everything is done via a ‘patch’, it will find no place in the Play Store. Get Lucky Patcher here.

Wanna Play Outside the Play Store?

Even though the Play Store is filled with millions of apps (and hundreds are added every day) there are still a few around the world wide web that are not published there, for one reason or another. Have you tried any of these? What has your experience been? Do let us know in the comments section below.
How to Easily Control and Manage Volume on Android

How to Easily Control and Manage Volume on Android

09:34 0
One thing I like about Samsung phones that I don’t find on other devices is how they handle volume when any of the volume rockers are pressed. When either button is pressed, you first get the option to control ringtone volume, but then, using the settings button next to it you can configure notification, media, alarm volume, and more. On other phones, you have to actuallyplay a media file to control the media volume or dig all the way into the settings to make changes.
mobile volume
Image via Shutterstock
Today I am going to talk about an amazing app that smartly controls different modules of volume on your Android device. The app’s name is Persist Volume Control – sure, with it you can control your phones’ volume, but that’s not all. Let’s have a look at the different features the app provides to make our lives easy.

Read also : 6 Awesome Android Apps Not Available on Google Play Store

Persist Volume Control for Android

Once you install Persist Volume Control, it will list all the independent volume controls on your phone. You’re probably not even aware of most of them. The app also adds a notification drawer control that handles the volume of individual modules. Moreover, it displays the approximate level each volume control is set to with a swipe on the screen.
PERSIST VOLUME CONTROL (6)PERSIST VOLUME CONTROL (5)
Persist allows you to configure different profile settings where you can control the volume based upon your location and surrounding. You can create an office profile for minimal sound and a home profile for ringer and media volume to be high. These presets can be applied using the notification drawer in the free version. But in the paid version for $3.49, the app gives you amazing features that allow you to apply these presets automatically.
PERSIST VOLUME CONTROL (1)PERSIST VOLUME CONTROL (3)
Location, time, calendar schedule, and volume trigger – there are many triggers you can select to auto-apply presets. Like for a location-based preset trigger, you would be asked to select the location and a radius of effect. After you save the settings, the app will automatically apply the preset volume settings whenever you are in the area.
PERSIST VOLUME CONTROL (4)PERSIST VOLUME CONTROL (2)
Cool Tip: If you wish to auto-toggle home and office mode, you will have to create two location-based triggers.
In the settings you have a volume locker for when the phone is in a locked state along with the ability to choose the notification widgets. There’s an experimental feature here that can set different alert levels for ringtones and notification tones. This helps when you wish to ignore your WhatsApp and Messages pings, but still want to keep the ringer on loud.
PERSIST VOLUME CONTROL (7)
Cool Tip: The app can be used by Samsung Galaxy S4 and S5 users who are experiencing ringtone volume drop for no reason after upgrading to Lollipop. The bug lowers your notification volume when the phone is kept idle for a while, but using Persist Volume Lock fixes the issue.

Conclusion

So that was how you can use this simple app to manage volume on your device in a smarter way. The free version is great for beginners who just need simple volume control. But if you really need hardcore settings to make sure you always have the right volume on Android, buying the app is a great option as well.
How to Edit Your MP3 Files On PC

How to Edit Your MP3 Files On PC

03:24 0
It's sometimes useful to be able to edit an audio MP3 file on your PC. For example, you might want to remove the applause from the end of a downloaded track, or cut out the preamble from the start. Or maybe you want to increase the volume, or standardize the volume so that there are no sections which are inaudibly quiet.
The "Audacity" program is synonymous with free audio editors for Windows. Trouble is, I've never really liked it much. It's large, very complicated, and full of amazing features which, frankly, you'll never use. Unless you're a professional audio person, being able to cut, copy and paste audio, and adjust the volume settings, is probably all you'll need.
Acoustica MP3 editing windowAcoustica is a commercial audio editing program for Windows. The standard edition costs a very reasonable $40 or so. Even better news, however, is that there's also a completely free version available too. And if you really only want the basic functions I mentioned above, plus a handful of others for good measure, it'll do you just nicely.
The program is only a 5 MB download, and is way more simple to use than Audacity. You'll find the download at http://acondigital.com/downloads/ and you'll need to follow the link to the Basic edition. The program is malware-free according to VirusTotal and Web of Trust, and should work on Windows Vista and above.
I don't edit audio files very often. But when I do, I'll be using Acoustica from now on.
Start Learning Windows 10 With A Free Book

Start Learning Windows 10 With A Free Book

03:22 0

Windows 10 book cover

The final release of Windows 10 will start to hit PCs at the end of July, and will be available to almost everyone as a free upgrade. A good place to start understanding some of the new and different features in this version is to check out a book by well-known journalist Ed Bott, called "Introducing Windows 10 For IT Professionals".
The book is currently published as a preview edition, pending the final version of Win10. It will be updated later on. You can download the current version as a free PDF file right now (and the updated version when it's finished, too). Just go to http://www.microsoftvirtualacademy.com/ebooks#9780735696969 and you'll find the title listed. It's a 6 MB download, and of course you'll also need a PDF reader program installed too.
How to Update PSP Firmware

How to Update PSP Firmware

00:03 0
I always have and always will believe that it’s worth installing an upgrade to firmware for any device, whether it be a computer, wireless router, or game console. In this article I am going to walk you through the steps required to upgrade the firmware on a PSP device.
Unfortunately, it’s not as easy as double-clicking an EXE file and watching the magic happen. With a PSP, in order to update the firmware, you have to follow a couple of steps. However, they are fairly simple steps that don’t require much technical know-how.
Note that there are three ways to update the firmware on a PSP: using a computer, network update, and update using a UMD. I am going to talk about the first method.
Step 1: First, download the latest PSP firmware from the PSP System Software site.
Step 2: Once you download the update to your computer, you need to copy it to Memory Stick Duo media. You can either plug the Memory Stick Duo card into your PSP and then connect the PSP to your computer, or if you can copy it to the memory stick some other way, that’s fine also.
Step 3: Before you copy the file to the Memory Stick Duo, you first need to create a few folders. On the stick, create a folder called PSP, then create a folder inside that called GAME, and finally create a folder inside GAME called UPDATE.
Note that all of the folder names need to be capitalized or else it will not work.
upgrade psp firmware
Step 4: Make sure to copy the firmware update file into the UPDATE folder on the memory stick.
Step 5: Now make sure to fully charge your PSP and plug it into a wall outlet. If you do not fully charge it, the update could fail due to a glitch.
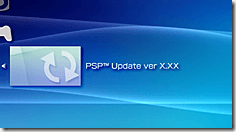
Step 6: Insert the memory stick into the PSP if it’s not already there and then click on Game from the home menu and choose Memory Stick by pressing X. You’ll now see the version of the PSP update about to be installed.
psp update version
Step 7: Choose PSP Update Version and you’ll get a screen that has a Start button on it. Press Start to begin the firmware upgrade. DO NOT press a single button on the PSP or even touch it while it is updating.
Step 8: To make sure the update worked, go to Settings from the Home menu, then System Settings, then System Information. You should see the new version number for System Software.
software version psp
Upgrading your PSP is a good idea because there are a lot more games and software applications that run on the new versions. You can also update your PSP using a wireless Internet connection, but I find this method much easier and safer.
How to Uninstall and Reinstall Windows Updates

How to Uninstall and Reinstall Windows Updates

00:00 0
Even though installing updates in Windows is an easy process, the mechanism in the background that manages it all is fairly complicated. There is also a lot of misinformation on the Internet about how to deal with problems relating to Windows Update.

Read also: How to Update PSP Firmware
One of the biggest misconceptions is that all Windows updates can be installed at once by simply deleting the SoftwareDistribution folder stored in C:\Windows. This is completely wrong. Yes, you might save some space (anywhere from 500 MB to several GB’s), but deleting the folder will not remove any installed update.
In addition it’s a bad idea to delete the SoftwareDistribution folder unless it is absolutely required. There is a subfolder called DataStore that has a large database of all the Windows Updates available. This database will probably be a couple of hundred MBs in size. Deleting this database simply removes the Windows Update history for the computer.
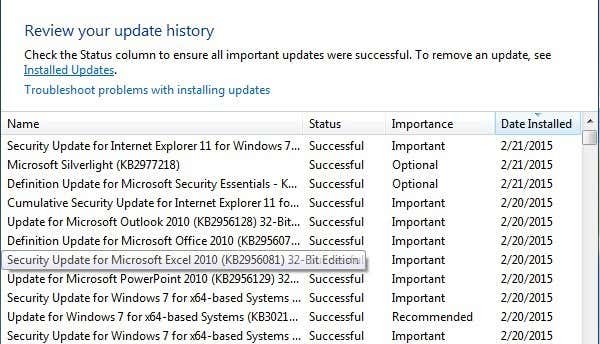
To prove this to myself, I did a test. I opened Control Panel, clicked on Windows Update and then clicked on View Update History in the left hand menu.
review update history
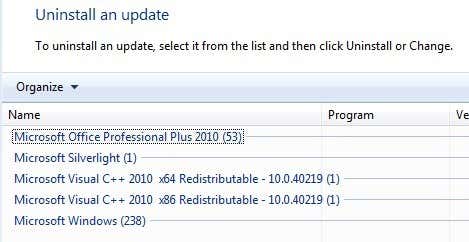
This screen just gives you a full list of installed updates with the StatusImportance and Date Installed. When we delete the SoftwareDistribution folder, this dialog will be completely empty as if you have never installed any updates. Before I show you that, click on the Installed Updates link at the top where it tells you how to remove an update.
windows update history
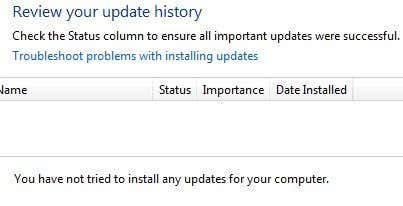
As you can see, I have a couple of hundreds updates currently installed for Office, Windows, Silverlight, etc. Now if you follow the instructions below for deleting the folder, you can go back to View Update Historydialog and you will see it’s now empty.
blank update history
However, if you click on Installed Updates again, you will see that all the updates that were listed before and still listed there. This is because we simply deleted the log history of the updates and not the actual updates.
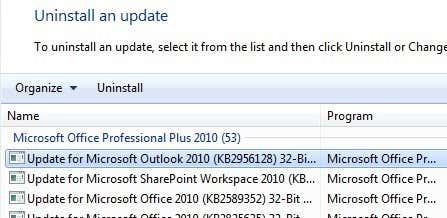
This dialog is where you can actually uninstall an update, but only one at a time. Simply click on an update and then click Uninstall. Unfortunately, there is no way to remove all updates at once unless you use System Restore.
uninstall an update
If you use System Restore and restore the computer to a previous restore point, any updates that were installed after that restore point will be gone. To remove all updates, though, you would need a restore point created right after the OS was installed. Even if a restore point was created at that point, older ones normally get deleted over time to make space for newer restore points.
Still, if you have a lot of space allocated to System Restore, you might be able to roll back a couple months worth of updates at once.
Once you delete the contents of the folder, you will need to revisit Windows Update via Control Panel and check for updates. The entire database will be built from scratch and you may notice that Windows showsChecking for updates for a very long time. This is because a list of every update applicable to the OS has to be downloaded again and then compared to the updates currently installed on the system.

Delete SoftwareDistribution Folder

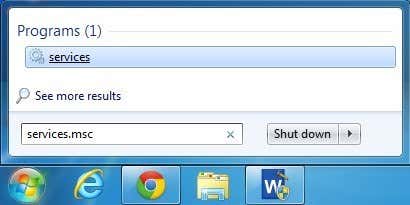
In order to remove this folder, you first have to stop the Windows Update and BITS services in Windows. To do this, click on Start and type in services.msc into the search box.
services msc
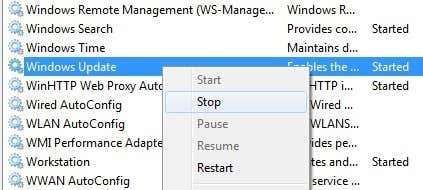
Next, right-click on the Windows Update service and click on Stop. Do the same thing for the Background Intelligent Transfer Service (BITS) service too.
stop windows update service
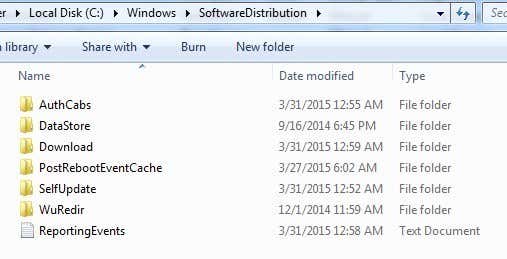
Now navigate to the following folder shown below and you will see several folders listed there. The main ones that we will talk about are Downloads and DataStore.
C:\Windows\SoftwareDistribution
software distribution folder
If you are trying to regain hard drive space only, then you should only delete the contents of the Downloadfolder, though in theory this should not really be necessary. The Download folder actually holds all the updates that have been downloaded, but not yet installed. Once they are installed, the updates are removed within 10 days. So theoretically, that folder should shrink in size soon after you have installed all the Windows updates.
The DataStore folder contains the database with the full Windows update history for the computer. Once it is deleted, the update history dialog will be blank like I had shown above, but all your updates will still remain. You should really never delete the DataStore folder unless you are told to do so or if Windows Update is completely corrupt and misconfigured.
Note that you may not be able to delete certain folders and the ReportingEvents file. In the case where you can’t delete a folder, just open the folder and delete all the contents inside. For me, I got an error when trying to delete the DataStore folder, so I just went inside the folder and deleted the database file and all the other files in the folder.

Check for Windows Updates

If you did remove the SoftwareDistribution folder, you will want to go to Windows Update again to check for updates. It will show that you have never perform a check for updates since the update history is now gone.
check for updates
Click the Check for updates button and be prepared to wait a while as the database is being recreated.

Conclusion

So the main point here is that you cannot really get rid of all Windows Updates at once unless you have a really old restore point saved on the system. Secondly, you should only delete the Downloads folder in the SoftwareDistribution folder if you are looking to save space or simply install all the latest updates and wait 10 days to see if they are removed automatically.
Thirdly, you should only delete the DataStore folder if something is really wrong with Windows Update like not showing any new updates for several months, etc. Hopefully, this gives you a better understanding of how Windows Update works and how the files are stored.
How to Set Away Message in Outlook

How to Set Away Message in Outlook

08:51 0
Going out of the office soon and need to setup an Out of OfficeAway or Vacation message in Outlook? You would think it would be super easy, but unfortunately it’s not! There are actually two ways of creating an automatic reply and it depends on whether Outlook is stand-alone or using Microsoft Exchange.
If your are in a corporate environment and Outlook is connected to MS Exchange, then setting an out of office reply is actually very easy. Let’s go through that method first and then we’ll discuss how to do it if you are not using Exchange.

Out of Office Message w Exchange

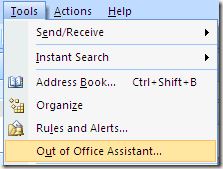
In Office 2007 and earlier, go to Tools and click on Out of Office Assistant. Note that this should be there automatically in Outlook 2003 and Outlook 2007 when using Exchange. If you don’t see the option, you’re not using Exchange.
out of office assistant
In Office 2010 and Office 2013, you have to click on the File tab, then Info and you’ll see a button calledAutomatic Replies (Out of Office).
out of office
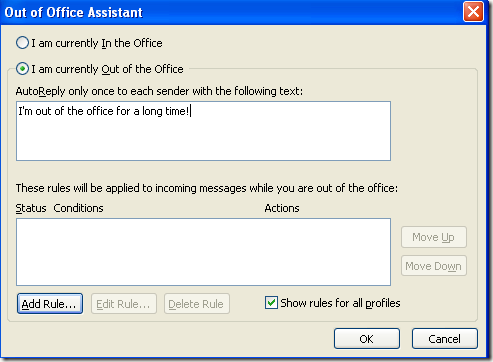
In Office 2007 and earlier, click on the I am currently Out of the Office radio button and type in the message into the AutoReply box.
out of office outlook
Go ahead and put the date you will be out till and also put in any contact info in case there is an emergency, etc. If you click OK, everyone will get this message until you come back to this dialog and change it to I am currently in the office.
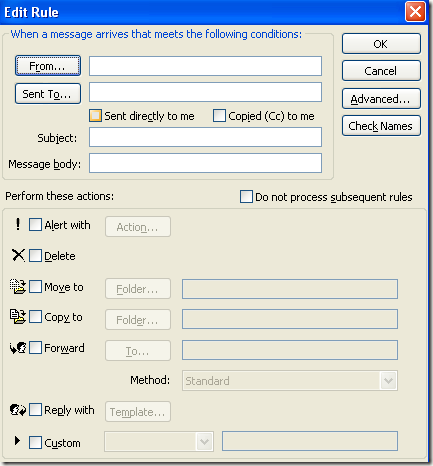
You can also add rules to incoming messages while you are out of the office by clicking on Add Rule. This is useful if you want to perform certain actions on emails coming from different people. For example, if you get an email from a client, you may want to forward it to your phone or reply with a different email template than the one used for internal employees. If you don’t know how to use rules, read my previous post on how to create Outlook rules.
email auto reply
In Outlook 2010 and 2013, it’s a bit different. When you click on Automatic Replies, you’ll get a pop up dialog like the one shown below.
automatic replies outlook
Select the Send automatic replies button and then check the Only send during this time range box if you know the exact dates you’ll be gone. If you leave it unchecked, it will simply leave the automatic reply on until you manually come and select Do not send automatic replies.
What’s also cool about this version is that you can have a separate auto reply setup for people inside and people outside your organization. Again, as with the earlier versions of Office, you click on Rules if you want to add exceptions to the auto reply.

Out of Office Message w/o Exchange

So this is great if you have Outlook with Exchange, but what if you don’t have access to Out of Office Assistant or Automatic Replies? Well there is a way you can EMULATE the out of office assistant by creating an automatic reply rule along with a out of office template. Here are the steps below.
Step 1: First create a new message in Outlook as if you are going to write someone an email. Do not put anything in the TO or CC boxes. Type in your away email message and put in a subject also.
new office email
Click on the Microsoft Office button or the File tab in newer versions of Office and choose Save As. In the Save as type combo box, select Outlook Template. Type a name such as Out Of Office Reply in theFile Name box and click Save.
out of office template
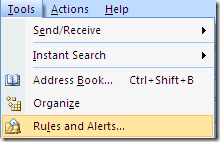
Step 2: Now all we need to do is create a rule and tell Outlook to use the new email template we just created. For Office 2007, click on the Tools menu and go to Rules and Alerts.
rules and alerts
In Office 2010 and 2013, click on the Home tab, then click on Rules and then click on Manage Rules & Alerts.
manage rules
Click on New Rule under Email Rules to create a new Outlook rule.
new rule outlook
Under the section Start from a blank rule, go ahead and click on Check messages when they arrive in older versions of Office or Apply rule on messages I receive in newer versions of Office, then click Next.
apply rule outlook
Next you’ll have to choose which conditions, if any, you want to check. For out of office auto replies, I normally don’t check anything since I want it to apply to any email that I receive.
outlook rule condition
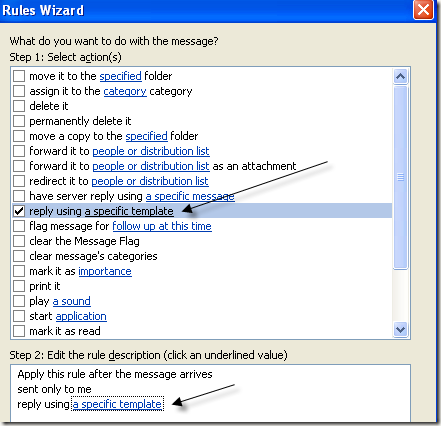
Click Next and then under Actions, check the box that says “Reply using a specific template” and then in the second text box at the bottom, click on the link that says a specific template.
reply using specific template
Now select the template that you had created earlier from the list of templates. If you do not see your template, click on the Look In combo box and choose Use Templates in File System.
reply template outlook
Click Open and then click Finish. Now whenever you get a new email, an automatic response will be sent using your auto reply template. Outlook remembers whom it sends the messages too and will only send it once to each email address.
To turn it off, you have to go back into Rules and Alerts and uncheck the box next to the rule. Also, you have to make sure that Outlook is open on your computer before you leave in order for it to send the auto replies! If you have any questions, feel free to leave a comment. Enjoy!