Showing posts sorted by date for query Download. Sort by relevance Show all posts
How to Uninstall and Reinstall Windows Updates

How to Uninstall and Reinstall Windows Updates

00:00 0
Even though installing updates in Windows is an easy process, the mechanism in the background that manages it all is fairly complicated. There is also a lot of misinformation on the Internet about how to deal with problems relating to Windows Update.

Read also: How to Update PSP Firmware
One of the biggest misconceptions is that all Windows updates can be installed at once by simply deleting the SoftwareDistribution folder stored in C:\Windows. This is completely wrong. Yes, you might save some space (anywhere from 500 MB to several GB’s), but deleting the folder will not remove any installed update.
In addition it’s a bad idea to delete the SoftwareDistribution folder unless it is absolutely required. There is a subfolder called DataStore that has a large database of all the Windows Updates available. This database will probably be a couple of hundred MBs in size. Deleting this database simply removes the Windows Update history for the computer.
To prove this to myself, I did a test. I opened Control Panel, clicked on Windows Update and then clicked on View Update History in the left hand menu.
review update history
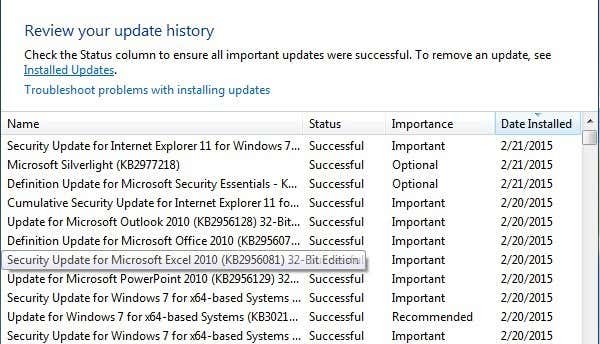
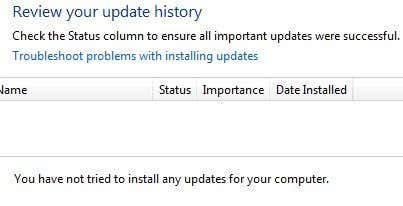
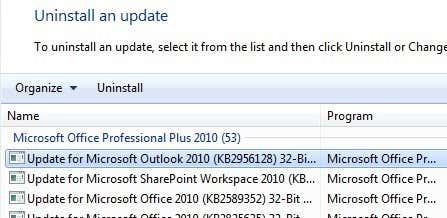
This screen just gives you a full list of installed updates with the StatusImportance and Date Installed. When we delete the SoftwareDistribution folder, this dialog will be completely empty as if you have never installed any updates. Before I show you that, click on the Installed Updates link at the top where it tells you how to remove an update.
windows update history
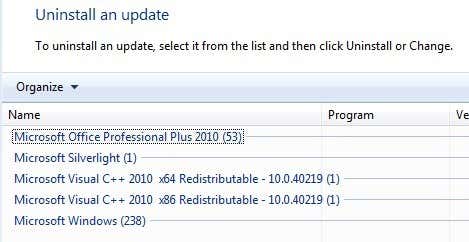
As you can see, I have a couple of hundreds updates currently installed for Office, Windows, Silverlight, etc. Now if you follow the instructions below for deleting the folder, you can go back to View Update Historydialog and you will see it’s now empty.
blank update history
However, if you click on Installed Updates again, you will see that all the updates that were listed before and still listed there. This is because we simply deleted the log history of the updates and not the actual updates.
This dialog is where you can actually uninstall an update, but only one at a time. Simply click on an update and then click Uninstall. Unfortunately, there is no way to remove all updates at once unless you use System Restore.
uninstall an update
If you use System Restore and restore the computer to a previous restore point, any updates that were installed after that restore point will be gone. To remove all updates, though, you would need a restore point created right after the OS was installed. Even if a restore point was created at that point, older ones normally get deleted over time to make space for newer restore points.
Still, if you have a lot of space allocated to System Restore, you might be able to roll back a couple months worth of updates at once.
Once you delete the contents of the folder, you will need to revisit Windows Update via Control Panel and check for updates. The entire database will be built from scratch and you may notice that Windows showsChecking for updates for a very long time. This is because a list of every update applicable to the OS has to be downloaded again and then compared to the updates currently installed on the system.

Delete SoftwareDistribution Folder

In order to remove this folder, you first have to stop the Windows Update and BITS services in Windows. To do this, click on Start and type in services.msc into the search box.
services msc
Next, right-click on the Windows Update service and click on Stop. Do the same thing for the Background Intelligent Transfer Service (BITS) service too.
stop windows update service
Now navigate to the following folder shown below and you will see several folders listed there. The main ones that we will talk about are Downloads and DataStore.
C:\Windows\SoftwareDistribution
software distribution folder
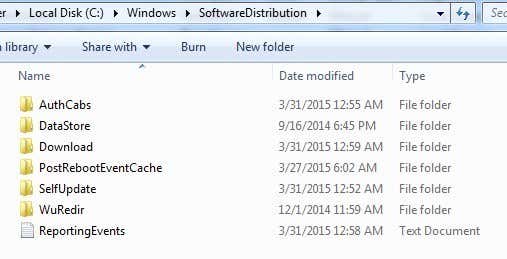
If you are trying to regain hard drive space only, then you should only delete the contents of the Downloadfolder, though in theory this should not really be necessary. The Download folder actually holds all the updates that have been downloaded, but not yet installed. Once they are installed, the updates are removed within 10 days. So theoretically, that folder should shrink in size soon after you have installed all the Windows updates.
The DataStore folder contains the database with the full Windows update history for the computer. Once it is deleted, the update history dialog will be blank like I had shown above, but all your updates will still remain. You should really never delete the DataStore folder unless you are told to do so or if Windows Update is completely corrupt and misconfigured.
Note that you may not be able to delete certain folders and the ReportingEvents file. In the case where you can’t delete a folder, just open the folder and delete all the contents inside. For me, I got an error when trying to delete the DataStore folder, so I just went inside the folder and deleted the database file and all the other files in the folder.

Check for Windows Updates

If you did remove the SoftwareDistribution folder, you will want to go to Windows Update again to check for updates. It will show that you have never perform a check for updates since the update history is now gone.
check for updates
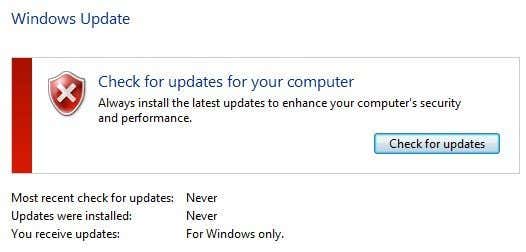
Click the Check for updates button and be prepared to wait a while as the database is being recreated.

Conclusion

So the main point here is that you cannot really get rid of all Windows Updates at once unless you have a really old restore point saved on the system. Secondly, you should only delete the Downloads folder in the SoftwareDistribution folder if you are looking to save space or simply install all the latest updates and wait 10 days to see if they are removed automatically.
Thirdly, you should only delete the DataStore folder if something is really wrong with Windows Update like not showing any new updates for several months, etc. Hopefully, this gives you a better understanding of how Windows Update works and how the files are stored.
How to Configure Windows 7 for Maximum Security

How to Configure Windows 7 for Maximum Security

04:35 0
How to Configure Windows 7 for Maximum Security - Out of the box, Windows is not by option organized for peak warranty, tho' it does act individual front settings that can be organized to engage tighter defence. Often nowadays when we get a new machine or place a new edition of Windows, we dive perpendicular to using the operative method and installment our dearie programs and apps, without considering mounting up the real plan options that Windows offers.
How to Configure Windows 7 for Maximum Security
If you want to lock down Windows for max security, you might want to consider adjusting the following settings:

Set Internet Options

The internet options for Windows, accessible at Start > Control Panel > Network & Internet > Internet Options, control basic Windows + internet functionality, but they also are tightly knitted into Internet Explorer, the default Windows browser.
Windows Internet Options
Internet Explorer is a bit of a virus magnet, although the latest version is much improved. Even so, as mentioned above, IE is more rooted into the actual operating system compared to a browser that you would download, such as Chrome or Firefox, so these Internet Options are something that I like to set to maximum security whenever setting up a new Windows install.
Set Internet Options for your Windows computer accordingly, the way you want them. For max security and maximum performance, you may want to consider the following settings:
- Security tab
Set each zone, Internet, Local intranet, Trusted sites, and Restricted sites to high by sliding theslider to the upward most setting. Also, click to check the Enable Protected Mode for each zone.
Internet Options Security Tab
*These settings will effect how Windows handles Internet Explorer, but also some other applications that require internet access too. If you find that setting a zone to high causes implications with a program, such as Skype, you may want to lower the zone security setting from High to Medium-high, or set custom security preferences for that zone using the Custom level… option.*
- Privacy Tab
The Privacy Tab mainly controls how Windows handles cookies, but it also contains some other internet preferences too. For max security:
Set the Internet zone setting to Block All Cookies. Also, check Never allow websites to request your physical location, Turn on Pop-up blocker and Disable toolbars and extensions when InPrivate Browsing starts.
IE Block all Cookies
Also, select the Settings button under the Pop-up Blocker listing and set the blocking level to High.
IE Blocking Level
Finally, with Internet Explorer locked down and general Internet Options for Windows more defense set, consider downloading Google Chrome or Firefox.

Advanced Sharing Settings

Advanced sharing settings in Windows are accessible at Start > Control Panel > Network & Internet > Network and Sharing Center > Change advanced sharing settings.
Set Public to the following settings:
  • Network discovery – off
  • File and printer sharing – off
  • Public folder sharing – off
  • File sharing connections – Use 128-bit encryption…
  • Password protected sharing – on
Set Home or Work to the following settings:
  • Network discovery – on
  • File and printer sharing – on
  • Public folder sharing – on
  • File sharing connections – Use 128-bit encryption…
  • Password protected sharing – on
  • HomeGroup connections – Allow windows to manage homegroup connections

Configure Automatic Updates

The updates that Microsoft releases for Windows are important for keeping Windows secure. Bug fixes and other security updates are often distributed through Automatic Updates, accessible via Start > Control Panel > System and Security > Windows Update.
Click the Change settings button and consider setting up Automatic Updates with the following settings:
Windows Automatic Updates

Configure Windows Firewall

Windows Firewall is accessible via Start > Control Panel > System and Security > Windows Firewall. Make sure that Windows Firewall is on! Additionally, you may want to configure the following settings:
Click the Advanced Settings button.
Firewall Advanced Settings
From the Windows Firewall with Advanced Security window, select Actions > Properties.
Windows Firewall Settings
Setup the Inbound, Outbound and Protected network connections for Domain Profile, Private Profile and Public Profile to your preference for firewall settings.

Setup User Account Control settings (UAC)

User account controls are accessible via Start > Control Panel > System and Security > Change User Account Control Settings. For maximum security, you may want to setup UAC as so:
Windows UAC
Always notify is the max security setting; however, the Default option might be a better choice for most Windows users. With the Always notify setting on (max security), Windows notifies you even when you make changes to Windows, a bit of overkill.

Setup Flash Player Settings

Most people likely have Adobe Flash player installed so that they can view web content such as YouTube videos. You can adjust specific settings for Adobe Flash Player from Windows using the path Start > Control Panel > System and Security > Flash Player.
For maximum security:
  • Block all sites from storing information on this computer

Windows Security Options

That's essentially all there is to it. By adjusting a few settings within the effective ngo of the Windows operating group, you can represent Windows much protected. Some of these advisable settings may be overkill and unneeded. Notwithstanding, if you impoverishment to configure the operating method for maximum dod, this is how you should set it up.
Also note, several of these settings can opinion remaining programs, so if set to extremum security, they may keep whatsoever features of other programs from operating aright. You may poverty to modify these settings accordingly for your part Windows + apps/programs equipment.
How to Find BIOS Version on Computer or Laptop

How to Find BIOS Version on Computer or Laptop

18:59 0
How to Find BIOS Version on Computer or Laptop, Need to find or check the current BIOS version on your laptop or desktop computer? The BIOS or UEFI firmware is the software that comes installed on your PC motherboard by default and that detects and controls the built-in hardware including hard drives, video cards, USB ports, memory, etc.

Read also: How to Make Your Computer Can Talk or Speak What You Type
Whether you need to update the BIOS or not is something I’ve written about previously and the basic premise of that article was not to update unless you really have a specific need to.
So how do you go about figuring out if you need to update the BIOS on your computer? Well first you’ll need to figure out the current version of the BIOS. In this article, I’ll explain multiple ways you can determine the BIOS version. Once you have the current version, you can visit the manufacturer’s website to see what the latest version is.

System Information

Click on Start, choose Run and type in msinfo32. This will bring up the Windows System information dialog box.
system information bios
In the System Summary section, you should see an item called BIOS Version/Date. Now you know the current version of your BIOS.

Command Line

Another easy way to determine your BIOS version without rebooting the machine is to open a command prompt and type in the following command:
wmic bios get smbiosbiosversion
bios version cmd
The command line will just give you the version number of the BIOS and that’s pretty much it. However, there are more commands that will get you a bit more info.
wmic bios get biosversion
wmic bios get version
get bios version cmd

Windows Registry

Just about everything in Windows is stored in the Registry and the version of the BIOS is no exception! Go to the following key:
HKEY_LOCAL_MACHINE\HARDWARE\DESCRIPTION\System
And you’ll see several keys related to the BIOS, including SystemBiosDateSystemBiosVersion,VideoBiosDate, and VideoBiosVersion.
registry system bios

Windows Startup

Another method to determine the BIOS version on your computer is to simply restart the computer. Some computers, including Dell, show you the BIOS version number when the computer first boots up.
dell bios
If not, you can enter the BIOS setup by pressing F12, DEL, F10 or F12 when it shows up during startup. Other computer manufacturers may have a different key to enter setup, but it will usually tell you which key to press.
bios version
Since the BIOS interface is different for just about every computer manufacturer, you will have to navigate around until you see BIOS Revision or BIOS Version.
If you are using a newer computer running Windows 8 with UEFI instead of the traditional BIOS, you won’t be able to press any key during startup. In those cases, you have to boot to the System Recovery Optionsscreen. Once there, you have to click on Troubleshoot and then Advanced Options.
This is the same method for getting Windows 8 into Safe Mode, but instead of clicking on Startup Settings, you should click on UEFI Firmware Settings. Note that you won’t see this option if your BIOS isn’t UEFI.
uefi firmware settings

Third Party Software

If you’d prefer to use a third-party utility that can give you other information about your computer too, then a good option is Speccy. It’s from the same company that created CCleaner, one of the best maintenance tools for Windows PCs.
bios speccy
Click on Motherboard and then you’ll see a section called BIOS that gives you the BrandVersion andDate of the BIOS. The program also gives you a lot of other system info on CPU, RAM, Storage, etc.

Conclusion

So those are pretty much all the different ways you can determine your BIOS version. Updating your BIOS is something you should only do if needed and with great caution. A failed BIOS update can brick your entire computer and force you to spend a lot of money getting it repaired.
When updating the BIOS, there is no single way to go about it. Each motherboard manufacturer has their own set of tools for updating the BIOS. Some have the options in the BIOS itself to update, others require you to boot from a USB drive and flash the BIOS that way.
Each BIOS file will usually come in a compressed archive package that includes a ReadMe text file. It’s essential you read that file because it will have exact instructions for updating the BIOS.
The only method of updating the BIOS that you should avoid is the Windows option. This is usually a Windows application you can download and run from within Windows to flash the BIOS. The problem is that it can fail since Windows is still running and it’s usually not even recommended by the manufacturers themselves. It is the easiest way, but it carries the most risk of failure.